New Kitchen Faucet Installation DIY Tips. How to install or fix a new kitchen sink faucet? How to replace a new kitchen faucet? Putting In a New Kitchen Faucet is easy, just follow the tips now.
Project Difficulty: Moderate
Estimated Project Time: 3 hours
| Tools and Materials: | ||
| Faucet Tape measure Flashlight Safety goggles Basin wrench Adjustable wrench Putty knife Plumber’s putty or latex adhesive tub and tile caulking Caulking gun, as needed Braided stainless-steel risers (to replace old risers) | ||
The kitchen is the most frequently remodeled room in the home. If you’re included in the growing number of homeowners who wants to make some improvements to the kitchen, installing a new kitchen faucet is a great place to start. Faucets are not difficult to put in and they can be relatively easy on the pocketbook. They are available in many styles and finishes and made to fit the needs of all people, from small children to those with physical disabilities. Faucet prices are directly proportional to the type of finish you select as well as the faucet style.

You can choose a faucet that has the spout and handles combined in a single unit, called a center-set faucet (Fig. 1), or a spout that is separate from the hot and cold handles, called a wide-set faucet. Center-set faucets can have two handles, one for the hot water and one for the cold water, or a single lever that controls the water’s temperature and flow. Another option is to purchase a faucet that comes with a pullout spray nozzle, perfect for rinsing fruits, vegetables, and the like.
You will need to select a model that fits the mounting holes in your sink, so be sure to measure the distance between the holes (usually eight inches) and have this measurement with you when you purchase your faucet. If you have an under-mount faucet, however, then you won’t have a baseplate and you can move the components around to suit your needs, up to a point.
Before starting to work, shut off the water by closing the shutoff valves under the sink. There should be two valves, one for the hot water and one for the cold. If you don’t have shutoff valves under your sink, you can turn off the water at your water meter or your pressure tank, although this will shut off the water to your entire house. Turn the faucet knobs on the sink to drain any water in the lines and relieve the pressure. You might want to use a flashlight to help see what you’re doing while you’re under the sink. It’s also a good idea to wear safety goggles to protect your eyes from any debris that might fall.

1. Unhook the Faucet Shanks
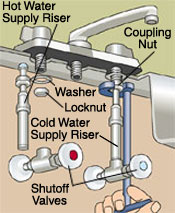
Place a bucket under the hot and cold water-supply risers (supply pipes). Using a basin wrench or an adjustable wrench, disconnect the supply risers (supply pipes) from the faucet shanks and from the shutoff valves by turning the coupling nuts counterclockwise (to the left). Remove the supply risers because they will be replaced later in Step 7. (Fig. 2)

2. Unscrew the Spray Hose
Disconnect the spray hose of your old faucet if it has one. Using your basin wrench or an adjustable wrench, unscrew the nut connecting the spray hose to the faucet. Remove the hose.
3. Disconnect the Mounting Nuts and Washers
Using your fingers or an adjustable wrench, unscrew the faucet mounting nuts and the washers from the shanks under the basin. Turn the mounting nuts counterclockwise (to the left) to loosen them. (Fig. 3)

4. Lift Out the Faucet
The faucet should now be totally free, and it can be removed by simply lifting it out of the sink. Use your putty knife to scrape off any caulking or adhesive left on the sink (Fig. 4). Any debris must be scraped off so that the new faucet can sit flat on the sink.
5. Insert the New Faucet
Place the gasket that came with the faucet over the mounting holes in the sink, aligning the holes in the gasket with those in the sink. If your faucet doesn’t use a gasket, apply a bead of latex adhesive tub and tile caulk or a bead of plumber’s putty around the lip of the faucet baseplate. If you are using adhesive caulk,

check with the manufacturer to make sure it won’t discolor or stain your type of sink. Insert the faucet shanks through the mounting holes and press down firmly on the faucet (Fig. 5). Wipe away any caulk or putty that may have leaked out from under the baseplate.

6. Install and Tighten the Mounting Nuts
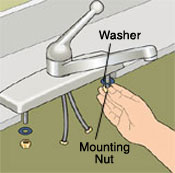
Screw the washers and mounting nuts onto the shanks of the faucet. Tighten the nuts, but don’t over tighten them, using your fingers, basin wrench, or your adjustable wrench (Fig. 6). This will secure your faucet to the basin.
7. Install the Risers

Your old risers may not reseat properly when they are reassembled, which will cause the connections to leak. Therefore, replace them with new flexible braided stainless-steel risers. You will then have an easy time connecting the new tubing because it’s flexible. Attach the risers to the faucet shanks and to the shutoff valves. Tighten the connecting nuts using your fingers, basin wrench, or adjustable wrench. (Fig. 7)
Some faucets have the supply pipes as part of the shank. These supply lines will need to be connected to the shutoff valves only. Other faucets use soft copper tubing. This tubing will need to be carefully spread apart before you attach it to the valves. Again, do not overtighten the nuts or you could distort the tube or strip the threads.
8. Finish the Job
If your new faucet has a spray hose, use your basin wrench or an adjustable wrench to connect the hose to the faucet. Turn the water back on and carefully examine all of the connections for leaks. If you do discover one, turn the nut a little at a time until the leak stops. You’re done! Your new faucet is now the focal point of your kitchen.


