Suggerimenti e tecniche per la riparazione del rubinetto della vasca che perde. Did you know that you can fix a leaking tub shower faucet and save literally hundreds of gallons of water a year? Most people just think of a dripping faucet as an annoyance and don’t realize how much precious water is being wasted one drop at a time. The good news is that almost anyone with a few basic tools can learn how to fix most dripping faucets.
Let’s start with the basics. Faucets have one primary purpose, to allow the water in your pipes to be used in a controlled manner. This means that they have to open to allow water out of the pipes and close to keep water in the pipes. Not rocket science, giusto? The closing part is what we want to concentrate on here.
There Are Two Basic Faucet Designs
Faucets drip when they fail to completely trap the water in the pipes. Most faucets use one of two basic methods to stop the water flow. Alcuni, primarily older designs, use rubber or neoprene washers which tighten against a “posto a sedere” and block the flow of water. Drips from these faucets are addressed by replacing the washers and/or seats. We’ll talk about how to do that in a minute. Most other faucet designs involve some sort of cartridge. Some people call these “washerless” rubinetti. Repairing newer style water faucets like these usually involves replacing the cartridge(S).
Washers And Seats
Older faucet designs often use washers to block the water and keep it in the pipes. Tightening the handle compresses the washer against a “posto a sedere” and seals the opening, thus stopping the water flow. If you need to do a bathtub faucet repair on a three< handle wall faucet you probably have this type. You will also run into this style if you need to fix a leaking shower faucet that has two handles. Many sink and lavatory faucets also use washers.
One way to tell whether or not your faucets use washers is to see if the handle gets harder to turn as you turn it off. If turning it really tight stops the drip, this probably, but not always, means that you have washers. If you do have a dripping faucet that has washers, the basic repair process is very similar whether you need to know how to repair a shower faucet,repair a leaking tub faucet or fix a dripping sink faucet. C'è, però, one important difference.
Riparazione del rubinetto della vasca da bagno
The one critical thing to remember when fixing a leaky bathtub faucet is that you will have to turn the water off to the entire house before removing any parts other than the outer trim pieces. If you’re not sure which pieces are trim, just turn the water off first just in case. Once you have turned off the main water to the house you can begin taking things apart. There are lots of different brands and designs of faucets out there and they all come apart a little differently, so you will have to sort of feel your way through.
Removing The Trim
The first step is to remove the handles. This is usually done by removing a cap to expose the handle screw and then removing the screw. Il prossimo, remove the handle. This may require a little finesse, as the handles sometimes get stuck in place. One trick is to place the handles of a pair of channel lock pliers behind the valve handle, one on each side, and tap evenly on the handle to nudge it loose. If this doesn’t work you can buy a special tool to remove handles but these tools are sometimes hard to find and usually a little patience is all you need to do the trick.
After he handles are off, there is usually some sort of sleeve over the stem itself. This typically has to come off too. Once again, there are many different configurations. One popular design uses threaded plastic tubes to connect the trim sleeve with the valve. Other types have the sleeve threaded directly onto the valve. You will have to figure this step out before you can proceed. If you can determine what brand valve you have there is a good chance of finding instructions on-line.
Now For The Root Of The Problem
Ok, so you have removed both the handles and any remaining trim sleeve from the valve. Now you are ready to get to the root of the problem, your valve> stem. The washer is almost always at the other end of the valve stem from the handle. Usually the stem is threaded into the valve body and you will just need to unscrew it to remove it. Here’s a tip. Stick the handle back on for a second and open the valve half way. This relieves pressure on the stem and makes it easier to unscrew.
Now you just need to make sure you are loosening the correct nut. Lots of valves have a packing nut around the stem. It is usually a little smaller and just in front of the actual connection with the valve body. The packing nut’s purpose is to squeeze some special packing material around the stem to prevent water from leaking around the stem when the valve is in use. Loosening the packing nut won’t help you, you need to get your wrench on the actual connection to the valve body. A proposito, a deep socket is often the only tool that will work to remove the valve stem.
Removing The Valve Stem
The easiest way to make sure you have the correct nut is to see if there is a gap opening up between the nut and the valve body as you loosen the nut. The valve stem itself will also usually turn when you have the right one. If you have loosened the packing nut by mistake, don’t worry, you will adjust it before you are finished anyway. Go ahead and remove both stems and keep up with which one is which, it matters on many valves.
After you have the stems out you should be able to find the washer on the “inside” end. If it is nicked, torn or brittle it is likely the cause of your drip. Even if it looks brand new, go ahead and replace it. You’ve already come this far. You can get replacement washers at almost any hardware store. Sometimes you may want to replace the whole stem, especially if the handle end is stripped out. It’s best to just take the stem with you to the store and see if you can match it up. Most Do It Yourself stores have replacement stems for many popular brands. If your valve has a center diverter valve to switch the water from the tub spout to the shower head the same process applies. Many times it is easier to replace the diverter stem than to repair it. This really depends on the design of the stem.
How Are Your Seats?
One more thing to check is the seats. These are the part of the valve body that the washer tightens up against to stop the water flow. If you can get your finger inside the valve, feel of the seats and see if they feel rough. In tal caso, it would be best to replace them if you can get them out. The inside of the seats, which is where the water flows through when the valve is open, usually have either a hex or square recess. Special seat wrenches are used to remove the seats. You can usually get these wrenches at the same place you get the other parts and they’re not expensive. You just stick the wrench through the seat and unscrew it. The replacement seats screw back in the same way, just put a little pipe dope on the threads before you install it.
Put It All Back Together
Once you’ve figured out what needs to be replaced and have done that, you just need to put everything back together. If your valve has packing nuts don’t put the trim back on until you have turned the water back on. Once the water is on, go ahead and stick the handle on for a second and open the valve. Make sure no water is leaking around the stem. If it is leaking, with the handle opened half way, snug down the packing nut until the leak stops. Easy does it. If you get it too tight the handle will
be hard to turn. Now finish installing the trim pieces and you are done.
Repairing Newer Style Water Faucets
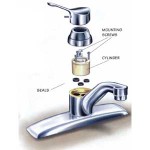
If you have a newer, “washerless” type valve the repair process is similar, but usually easier. Many of these type valves use a self contained cartridge. If the valve starts to drip, just replace the cartridge and you’re done. You still need to turn the water off and remove the handles and trim. The cartridge is usually held in place by a retaining nut on the valve body or, in the case of most Moen valves, by a retaining clip. Simply remove the cartridge and put another one in it’s place. If your hot and cold are backwards when you finish, turn the water back off, pull the cartridge back out, turn it over 180 degrees and re- install it.
Delta Style Valves
One other common design that is considered “washerless” was made famous by Delta and copied by several other makers. It uses little “cup” seals that fit over springs recessed in the back of the valve body. The springs press these “seals” against the cartridge and regulate the flow through little tapered openings in the cartridge. If you have one of these and it’s dripping, changing these springs and seals will usually correct it. Here’s a tip. Once you have the cartridge out of the way, insert a phillips screwdriver into the seal and pop both the seal and spring out. Stick the new ones on the end of the screwdriver to help guide them into place. This is especially helpful if you don’t have long slender fingers.
Delta, and a few imitators, also have a faucet design that uses a ball instead of a cartridge. This is not as common in tub or shower valves but there are plenty of them out there. The springs and seals are the same but there are lots more o-rings and parts to deal with. The good news is that these parts are readily available. While it’s a little more complicated than learning how to repair a Moen kitchen faucet, which is a piece of cake, it is still easier than working with most washer type faucets.
These Techniques Work In The Kitchen Too
Armed with the knowledge you’ve gained in this article you now not only know how to repair a shower faucet and to repair a leaking tub faucet, but you can apply these skills to many other faucets as well. After fixing a leaky bathtub faucet, stopping a dripping outside hose faucet will be a breeze. The techniques that you will use to complete a “washerless” bathtub faucet repair can be used when repairing newer style water faucets of all kinds. Whether you have an old dripping tub faucet or a newer kitchen faucet that just won’t quite shut off you can now fix it. So put these new skills to use, roll up your sleeves and stop that drip!


