How to Fix a Dripping Kitchen or Bathroom Faucet? Nobody likes a dripping faucet. Today, we’re going to show you how to repair your dripping faucet with relative ease.
Your faucet uses simple valves that control the flow of water. There are multiple types of valves within your faucet that control water flow: compression, disk, ball, and cartridge to name a few of the more common valves. We’ll focus on the compression valve for today’s post. While repairing your faucet, locate and shut off the valves in the lines for both hot and cold water.
The first thing to know when repairing your dripping faucet is what kind of valve is inside. If you have the owner’s manual, you can find out the specific model and brand and all the information you need to get started. If not, simply take the faucet to your local home improvement store and get help finding the necessary parts.
Follow these steps to repair your dripping faucet:
1) Shut off the water supply.
2) Open the faucet’s handle to eliminate water pressure.
3) Remove the trim cap on the faucet with a small screwdriver.
4) Use a crescent wrench to remove the nut inside.
5) Carefully lift the spindle out of the faucet.
6) Remove the O-ring and replace it if necessary.
7) Look over the seat and replace it if it is damaged.
8) Install the valve.
9) Place the handle back on the faucet.
10) Test to make sure it’s working properly.
Follow these steps to replace your dripping faucet:
1) Shut off the water supply.
2) Open the faucet’s handle to eliminate water pressure.
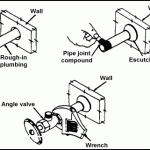
3) Loosen the nuts located at the shutoff valves and base of the faucet itself.
4) Remove the supply tubes.
5) Carefully remove the locknuts that anchor the faucet to the sink.
6) Lift the faucet out.
7) If necessary, replace damaged spray hose and supply tubes.
8) Place the rubber gasket on the sink where your faucet will be set. If you don’t have a rubber gasket use plumber’s putty instead.
9) Set the faucet into position.
10) Attach the faucet locknuts (located under the sink) to fasten it firmly to your sink.
11) Hook the supply lines back up.
12) Test to make sure it’s working properly.
From bathroom-kitchen-faucets.com, you many learn more about:
We will provide more faucet repair tips for your dripping faucet repair.


