• Saltar al contenido principal
  • Saltar al menú secundario
  • Saltar a la barra lateral principal
Cuarto de baño-cocina-Faucets.com

Cuarto de baño-cocina-Faucets.com

Grifos de cocina modernos y diseños de herrajes para baños

  • Hogar
  • Catalogo de producto
  • Acerca de
  • Contacto
  • Baño
    • Grifos de baño
      • Grifos monomando de lavabo
      • Grifo de lavabo cromado
      • Mezclador de bidé
      • Grifos de Ducha
      • Grifo de la ducha de bañera
    • Hand Bidet Spray
    • Muebles de baño vanidad
    • Accesorios de baño
  • Cocina
    • Pull-out grifo de la cocina
    • Accesorios de cocina
    • Iluminación del gabinete de cocina
    • Fregaderos de cocina de acero inoxidable
  • Grifos
    • Grifo automático del sensor
    • Grifos de Plástico para Grifería
    • Grifo de un solo toque
    • Mantenimiento grifo
    • Aireadores de grifo de ahorro de agua
    • Instalación y reparación de grifos
  • Duchas
    • Cabezales de ducha de mano
    • Mangueras de ducha de mano
    • Titular de la ducha
    • Barra de ducha & Carril de deslizamiento
    • Cabinas de ducha
    • Cuarto de baño de vapor
    • Bañera de hidromasaje
  • Decoración para el Hogar
    • Evento de cocina y baño
    • Reparación de calentadores de agua caliente
  • Suministros de fontanería
    • Mangueras flexibles trenzadas
    • Válvula de ángulo de latón
    • Servicio de fontanero
    • Desagüe de desechos emergente
Estás aquí: Hogar / Instalación y reparación de grifos / Lesson to Replace Leaky Bathroom Faucets

Lesson to Replace Leaky Bathroom Faucets

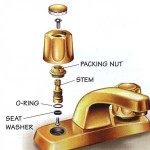
How to fix a leaky bathroom faucet? Lesson to Replace Leaky Bathroom Faucets. Tips on how to Install a Bathroom sink Faucet. Replacing an old leaky bathroom basin faucet can be done by yourself.

Materials List to Replace a Bathroom Faucet

  • Grifo
  • Pop-up drain assembly
  • Pipe joint compound
  • cinta de teflón
  • Masilla de fontanero
  • Penetrating oil

General Safety

  • Do not attempt a potentially dangerous project when you are tired, irritated, sick or under the influence of drugs or alcohol.
  • Wear approved eye protection when working with power tools or striking tools such as hammers.
  • When working in dusty situations, wear a dust filter mask over your mouth and nose.
  • Make sure you check building codes for your area before planning construction projects.
  • Keep all blades, bits and other cutting parts sharp on both power tools and hand tools. Dull tools can require you to apply extra force, which can lead to injuries.
  • Make sure you have a safe work environment that is well lit and free from obstructions and interference from clothing, long hair and jewelry.
  • Turn off breakers or remove fuses when working on all electrical projects.

Replacing a Bathroom Faucet Introduction

  • When replacing an old faucet there are generally three things to consider: how many holes your sink has, how far apart they are, and whether or not you will need to replace the drain.
  • Most bathroom sinks usually come with three different hole configurations. The most popular configuration is two holes four inches apart on center with a center hole between them (three holes total). Another similar configuration is two holes eight inches apart on center with a center hole between them (often called a spread set configuration). Finalmente, there might be just a single hole, which is a common configuration for newer sinks and faucets.
  • You will need to purchase a faucet that matches your particular hole pattern. It is not recommended that you try drilling holes in your sink or try to make a spread set fit in a 4 inch configuration. One exception to this rule, sin embargo, can be made for some single hole faucets that are designed with a wide base that will cover the extra holes in a 4-inch configuration.
  • Por lo general, it is a good idea to replace the drain when replacing the faucet. Típicamente, bathroom faucets are sold with pop-up drains but you can also get them with just a plug. If you do replace the drain, consider buying a new trap and tailpiece as well. It is much easier to work with new pipes than old and the cost is not prohibitive.

Helpful Tips to install a bathroom faucet

  • Make sure to wear safety glasses when working under the sink as bits of rust and metal can fall into your eyes as you are working.
  • Know where the main water shut off is just in case.
  • Have a small pail ready to catch leaks.
  • If you just can’t get the old faucet or drain out, consider replacing the sink as well. This course might still be cheaper than calling a plumber who might just tell you to replace the sink anyway.

STEP BY STEP Instructions to Replace a Leaky Bathroom Faucet

1.Turn off the water to the existing faucet at the shutoff valves. Luego, relieve pressure in the faucet by turning the hot and cold valves on.
How to Install a Bathroom Faucet 1
2.Remove the hot and cold supply tubes to the faucet. If you are replacing the drain with the new faucet, also remove the P-trap, and the linkage to the pop-up drain.
How to Install a Bathroom Faucet 2
3.también, if you are replacing the drain, unscrew the nut holding the rubber gasket against the sink. próximo, try to unscrew the drain flange from the T-connector. If this does not work (as it often does not) take a reciprocating saw (with a metal cutting blade) and cut the drain assembly in half just above the nut.
How to Install a Bathroom Faucet 3
4.To remove the faucet, use your basin wrench to unscrew the nuts under the faucet. Si necesario, use penetrating oil to get the nuts to turn and make sure you are unscrewing them the right way as it is easy to get disoriented under the sink. When the faucet is out scrape away any old plumbers putty or caulk with a putty knife.
How to Install a Bathroom Faucet 4
5.Some new faucets come with gaskets that seal between them and the sink while others require that you apply plumbers putty to make the seal. If yours is the latter, apply a generous amount of putty under the faucet so that it squeezes out as you put the faucet in place. próximo, tighten the nuts under the faucet until the faucet is secure while also making sure that it is properly aligned.
How to Install a Bathroom Sink Faucet
6.Wrap all the inlet fittings with Teflon Tape to ensure a tight seal before connecting hookups. Wrap the tape in the same direction as you will attach the fittings. To install the hookups, first attach them to the faucet with the help of the basin wrench and then to the shutoff valves using an adjustable wrench. Be careful not to twist them as you install them as this can restrict the water supply to the faucet and cause premature failure.
How to Install a Bathroom Basin Faucet
7.Assemble the new drain (if it does not come already assembled) by first applying pipe joint compound on the tailpiece and then screwing it into the T-connector. When finished, screw the nut all the way down on the T-connector followed by the plastic washer and rubber gasket. It is important that there be a washer between the nut and rubber gasket.
How to Install a Bathroom Lavatory Faucet
8.Put a heavy bead of plumbers putty around the drain flange and press it into the drain hole. próximo, coat the threads on the drain body with pipe joint compound and from under the sink screw the drain body into the drain flange. Once the flange and body are together, tighten the nut on the body till the gasket is pressed tightly against the underside of the sink. Make sure that when tight, the branch on the T-connector is facing towards the back of the sink.
How to Install a Bathroom Basin Mixer Tap
9.To install the pop-up linkage, first place the pop-up in the drain hole making sure that the slot in the bottom of the pop-up is facing the back of the sink. próximo, install the pivot rod in T-connector so that the rod finds the slot in the pop-up. Once lined up install the rods retaining nut snug so that the rod can still move but has no play.
How to Install a Bathroom Basin Mixer Tap Faucet
10.Insert the lift rod into the faucet and from below attach the clevis to the rod. With the lift rod down and the pop-up in the open position, insert the pivot rod into the nearest hole on the clevis while also having the rod pass through the spring clip. If all is aligned correctly the pop up should close when the lift rod is pulled up and open when it is put down again. Si no, make adjustments via the clevis screw.
How to Install a Bathroom Basin Mixer Faucet
11.Finalmente, unscrew the aerator from the spout, open the water shutoffs and turn the faucet on for several minutes. Check for leaks and then reinstall the aerator.
How to replace a Bathroom Faucet 11

What Kind of Bathroom Faucet do you want?

  • Single-hole and single-lever faucets integrate the spout and mixing handle or handles into one fitting. Compact and easy-to-use, they require only one faucet hole drilling. Some faucets will include an optional six-inch cover plate for existing four-inch drill installations.
  • Centerset faucets for standard four-inch drill installations handles mounted onto a six-inch plate. These are recommended for smaller, pre-existing, pre-drilled basins.
  • Widespread faucets offer the greatest design flexibility. A mini-widespread faucet has three separate pieces in a smaller, standard four-inch drilling. A widespread faucet has a standard spread or drilling of at least eight inches.
  • Wall-mounted faucets for above-the-counter and freestanding basins require a longer spout for extended reach.
  • In the bath, the faucet is typically set in either 4” or 8” width configurations. In the 4″ set you can have a centerset or mini widespread setup; if it is 8″ or more, it is known as a widespread set. When you choose your new faucet, you can change styles, but will have to stay with the same size, or replace the sink if you want to switch.

TAMBIÉN PODRÍA GUSTARTE

  • Fixing A Leaking Kitchen Faucet
    Reparaciones y consejos de fijación de grifos de cocina
  • How to Repair or Fix a Leaky Kitchen Sink Drain Pipe
    Cómo reparar o arreglar una tubería de drenaje del fregadero de cocina con fugas
  • kitchen_sink_faucet_led_light
    Reparación de grifos de lavabo y reemplazo de grifos de tocador
  • How to Fix a Leaky Faucet, Faucet Repair
    Cómo arreglar un grifo con fugas, Reparación de grifos
  • Modern Kitchen Faucet Ideas
    Cómo reparar un grifo de cocina con fugas
  • How To Fix A Leaky Kitchen or Bath Faucet By Yourself
    Cómo arreglar un grifo de cocina o baño con fugas usted mismo
  • Fixing a Leaky Ceramic Disk Faucet
    Reparación de un grifo de disco de cerámica con fugas
  • Compression Faucet Repair
    Arreglar un grifo de baño con fugas: Reparación de grifos de compresión
  • Pull Down Kitchen Faucet Spray
    Cómo reparar o reemplazar un rociador de grifo de cocina con fugas
  • Replace & Repair Leaky Bathroom & Kitchen Faucets
    Reemplazar y reparar grifos de baño y cocina con fugas
  • Graphite Black Bathroom Washbasin Tap Sink Faucet
    Cómo reemplazar un grifo del lavabo del baño con una sola manija
  • Brass Bathroom Sink Fixtures Picture
    Cómo reemplazar los accesorios del lavabo del baño

Archivado: Instalación y reparación de grifos Etiquetado con: grifo del lavabo del baño, Reemplazo de grifos, Cómo instalar faucet

Barra lateral principal

Busca el sitio

Traducción

EnglishDeutschEspañolPortuguêsFrançaisItalianoРусскийالعربية日本語
Establecer como idioma predeterminado
 Editar Traducción

Tienda en línea Sanliv

Twin roll toilet tissue paper holder

Accesorios de plomería

  • Grifos automáticos
  • Accesorios de baño
  • Reposapiés de ducha plegable
  • Grifo de la cocina
  • Espejos del maquillaje de aumento
Grifo de cocina abatible monomando de níquel cepillado
Níquel cepillado del estante de la pared del retrete del organizador del tenedor de la toalla del hotel
mezclador monomando para ducha y bañera
Grifo para lavabo de baño con manija única de color negro mate
Reposapiés para ducha Sanliv,Reposapiés de esquina para afeitar las piernas,Borde de ducha con peldaño de barra de latón moleteado,Niquel pulido
Grifo monomando extraíble para cocina dorado cepillado
Reposapiés de ducha Sanliv para afeitarse las piernas,Reposapiés de ducha montado en la pared,Ledge de soporte de pie de barra de latón moleteado,Negro mate
Philippe Stark grifos: Axor Starck Orgánica de Hansgrohe

Derechos de autor © 2025 Baño-Cocina-Faucets.com con Mapa del sitio