• Saltar al contenido principal
  • Saltar al menú secundario
  • Saltar a la barra lateral principal
Cuarto de baño-cocina-Faucets.com

Cuarto de baño-cocina-Faucets.com

Grifos de cocina modernos y diseños de herrajes para baños

  • Hogar
  • Catalogo de producto
  • Acerca de
  • Contacto
  • Baño
    • Grifos de baño
      • Grifos monomando de lavabo
      • Grifo de lavabo cromado
      • Mezclador de bidé
      • Grifos de Ducha
      • Grifo de la ducha de bañera
    • Hand Bidet Spray
    • Muebles de baño vanidad
    • Accesorios de baño
  • Cocina
    • Pull-out grifo de la cocina
    • Accesorios de cocina
    • Iluminación del gabinete de cocina
    • Fregaderos de cocina de acero inoxidable
  • Grifos
    • Grifo automático del sensor
    • Grifos de Plástico para Grifería
    • Grifo de un solo toque
    • Mantenimiento grifo
    • Aireadores de grifo de ahorro de agua
    • Instalación y reparación de grifos
  • Duchas
    • Cabezales de ducha de mano
    • Mangueras de ducha de mano
    • Titular de la ducha
    • Barra de ducha & Carril de deslizamiento
    • Cabinas de ducha
    • Cuarto de baño de vapor
    • Bañera de hidromasaje
  • Decoración para el Hogar
    • Evento de cocina y baño
    • Reparación de calentadores de agua caliente
  • Suministros de fontanería
    • Mangueras flexibles trenzadas
    • Válvula de ángulo de latón
    • Servicio de fontanero
    • Desagüe de desechos emergente
Estás aquí: Hogar / Accesorios para el baño / Instale un sistema de ventilación de desagüe de baño

Instale un sistema de ventilación de desagüe de baño

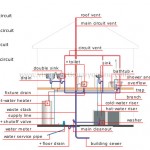
How to Install a Bathroom Drain Waste Vent System? Installing Drain Waste Vent Pipe is a professional plumber task. Running the pipe can be tricky. All different kinds of fittings are available to turn in different and receive different sizes of pipe at various angles. One fitting may need 3 opening ports, all accommodating a different size pipe. You will have to plan your runs and buy the necessary fittings (always get a few extra). Keep in mind that codes may regulate how fittings can be used (i.e. sanitary tees may not be used in vertical to horizontal connections; long sweep connection must be used here). You will need to know the diameter of your pipes, their angles, the code and their direction to determine each fitting. While planning may take some time and study, the cutting and assembly of plastic pipe is very simple.

1. Using a back saw or a fine toothed saw, cut the pipe the required length, remembering that the pipe fits into the fitting a prescribed distance for each diameter of pipe.

2. Use a small knife or rough sandpaper to remove the “burr” off the freshly cut pipe.

3. With a rag and some cleaning solvent, clean the ends of the pipe and the inside of fitting where the pipe will join. (ABS does not need this solvent or primer. It can be wiped clean with a damp rag.)

4. The glue will dry almost immediately and you can never get it unglued. To change the connection you must cut out the fitting and start over. Because of this, you want to be sure you have it right the first time. This is very easy in some cases, but often you will have a number of pipes coming into a fitting from several different angles. All of these must meet correctly once they are permanently glued. To assure this, “dry fit” the fittings and pipe by cutting and assembling everything without glue to assure it all fits at the correct angles and dimensions.

5. Make marks across fittings and pipe so that once the pipes are removed and the glue is spread, you will know exactly how to realign everything when the pipes are inserted permanently into the fitting. (Be sure the marks or lines are long enough on the pipe so that they will not be covered by the glue you will spread on the pipe.)

6. Spread a generous amount of the required pipe glue around the end of the pipe and on the inside of the fitting with a dauber.

7. Insert the pipe into the fitting until it “bottoms out” and give it a little twist to be sure that the glue is spread evenly.

One of the most difficult parts about running drain waste vent pipes is drilling the large (2-3″) holes necessary to run the pipe. You will need to purchase, borrow or rent special heavy duty plumbers’ bits that are notched to fit 1 1/2″, 2″ y 2 1/2″ tubo. The cheaper hole saw is just too difficult when you are doing a large project. You will also need a heavy duty 1/2″ or 3/4″ drill (preferably a right angle drill or one with a right angle attachment). Be careful, as drilling with these large bits often causes the bit to bind and the drill to spin.

TAMBIÉN PODRÍA GUSTARTE

  • Bathroom Sink Drain Trap Installation DIY Tips
    Guía de instalación de la trampa de drenaje del fregadero y los desechos emergentes
  • How to Install a Bathtub Drain
    Guía de instalación del desagüe de la bañera y consejos
  • plumbing system
    Sistema de plomería: distribución de agua fría-caliente, tubo…
  • Clearing a Clogged Floor Drain pic
    Desagüe de un desagüe de piso obstruido
  • How to clean a clogged plumbing drain pipe?
    How to clean a clogged plumbing drain pipe?
  • bathroom-p-trap
    Sifón en P para lavabo o lavabo de baño Sanliv
  • Ball Valve Installation in 9 easy steps
    Instalación de la válvula de bola en 9 pasos faciles
  • How to install Pop-up Wastes and Traps
    Los mejores consejos sobre cómo instalar trampas y desechos emergentes
  • Slotted Rod Operated Pop-Up Basin Waste
    Cómo instalar un desagüe emergente del depósito de varilla de palanca de empuje y tracción
  • Switching from cast iron to copper piping
    Cambio de tubería de hierro fundido a cobre
  • Bathroom Basin Pop Up Drain Waste
    Reparación de fugas de desechos de fregadero o lavabo emergente
  • Installing a New P-trap under Your Bathroom Sink
    Instalación de una nueva trampa en P debajo del lavabo del baño

Archivado: Accesorios para el baño, Accesorios de plomería & Suministros Etiquetado con: Desagüe del piso del baño, drain

Barra lateral principal

Busca el sitio

Traducción

EnglishDeutschEspañolPortuguêsFrançaisItalianoРусскийالعربية日本語
Establecer como idioma predeterminado
 Editar Traducción

Tienda en línea Sanliv

Twin roll toilet tissue paper holder

Accesorios de plomería

  • Grifos automáticos
  • Accesorios de baño
  • Reposapiés de ducha plegable
  • Grifo de la cocina
  • Espejos del maquillaje de aumento
Reposapiés para ducha Sanliv,Reposapiés de esquina para afeitar las piernas,Borde de ducha con peldaño de barra de latón moleteado,Niquel pulido
Grifo de cocina abatible monomando de níquel cepillado
Reposapiés de ducha Sanliv para afeitarse las piernas,Reposapiés de ducha montado en la pared,Ledge de soporte de pie de barra de latón moleteado,Negro mate
Grifo para lavabo de baño con manija única de color negro mate
Níquel cepillado del estante de la pared del retrete del organizador del tenedor de la toalla del hotel
Philippe Stark grifos: Axor Starck Orgánica de Hansgrohe
Grifo monomando extraíble para cocina dorado cepillado
mezclador monomando para ducha y bañera

Derechos de autor © 2025 Baño-Cocina-Faucets.com con Mapa del sitio