• Zum Hauptinhalt springen
  • Zum sekundären Menü springen
  • Zur primären Seitenleiste springen
Bad-Küche-Faucets.com

Bad-Küche-Faucets.com

Moderne Küchenarmaturen und Badezimmer-Hardware-Designs

  • Zuhause
  • Produktkatalog
  • Über
  • Kontakt
  • Bad
    • Badarmaturen
      • Mischbatterien für Waschbecken
      • Chrom-Toilettenarmatur
      • Bidet Mixer Wasserhahn
      • Duscharmatur
      • Badewanne Duscharmatur
    • Hand Bidet Spray
    • Badezimmerschränke
    • Badezimmerzubehör
  • Küche
    • Pull-Out Küchenarmatur
    • Küchenarmaturen
    • Küchenschrank Beleuchtung
    • Edelstahlspülen
  • Wasserhähne
    • Automatischer Sensorhahn
    • Kunststoff Wasserhahn Wasserhähne
    • Single Tap Wasserhahn
    • Wasserhahn Pflege
    • Wassersparende Wasserhahnbelüfter
    • Installation und Reparatur des Wasserhahns
  • Duschen
    • Handduschköpfe
    • Handbrauseschläuche
    • Duschkopfhalter
    • Duschstange & Gleitschiene
    • Duschkabinen
    • Dampfduschraum
    • Whirlpool Massage Badewanne
  • Home Decor
    • Küchen- und Badveranstaltung
    • Reparatur des Warmwasserbereiters
  • Plumbing Supplies
    • Geflochtene flexible Schläuche
    • Messingwinkelventil
    • Klempnerservice
    • Pop-up-Abfallablauf
Du bist hier: Zuhause / Pop-up-Abfallablauf / Installieren einer neuen P-Falle unter Ihrem Waschbecken

Installieren einer neuen P-Falle unter Ihrem Waschbecken

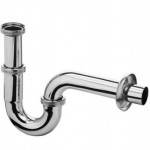
When you removed a clogged bathroom sink drain p-trap, you can install a new p-trap under your bathroom sink easy. If first time to install a new p-trap , Here’s a step-by-step User’s Manual & Owner’s Guide on how to install a new p-trap under your bathroom sink.

1. Make sure to buy the right p-trap. The correct pipe size is 1 1/2 inches for a bathroom trap. The easiest type to work with is PVC, but chromed metal looks better for exposed sinks. For a PVC trap, buy the package that comes with all the plastic gaskets and nuts. For a chromed trap, you’ll need rubber gaskets. The trap itself is 1 1/2-inch pipe, but the tailpiece from the sink is likely 1 1/4. You’ll need a transition gasket for this.

2. Test fit the p-trap onto the sink drain tailpiece and into the wall without the nuts. You may need to cut the tailpiece of the p-trap to fit into the wall drainpipe. The trap tailpiece should go as far as possible into the wall pipe. If the tailpiece is too short, you’ll need a 1 1/2-inch slip-joint extension to cover the distance. A slip-joint extension attaches to the trap tailpiece the same way the trap attaches to the sink drain tailpiece–a nut and gasket that creates a water-tight seal.

3. When the trap is cut to fit, slip the nut and then the 1 1/4-1 1/2-inch gasket over the sink tailpiece. Then slip the nut and 1 1/2-inch gasket over the trap tailpiece.

4. Assemble the p-trap. You will not need a gasket for this part if working with PVC, only a layer of pipe thread compound where the plastic surfaces meet. If working with chrome, spread thread compound on the surfaces where the gasket will touch. Make sure to tighten the nut on the p-trap snugly but not tight yet. This will give you flexibility to get the trap into place if needed.

5. Spread thread compound on the surfaces where the gaskets will touch on both the p-trap and wall pipe before setting it into place. Set the trap in place, and then slip the gaskets down the pipes to the threads, and then tighten the nuts over the gaskets hand tight. Schließlich, tighten the nut holding the p-trap together. If working with PVC and plastic gaskets, hand tight should be sufficient. With chrome, make the nuts hand tight plus a quarter turn with the channel locks or wrench.

6. To test your new trap, plug the sink and fill it completely. A full sink will fill the pipe and reveal any leaky spots right then. Now let the water go and watch for drips at all the trap’s connections. Make sure to touch the joints to feel for water, rather than just eyeballing. If you have a leak, tighten the nut a little more, wipe the joint dry and test again.

If you get persistent leaks, especially in one spot, check to make sure there’s not a problem with the gasket. Every professional at one point or another has forgotten one completely, so don’t feel so bad if you commit this heinous crime your first time out.

DAS KÖNNTE DIR AUCH GEFALLEN

  • How to Repair or Fix a Leaky Kitchen Sink Drain Pipe
    So reparieren oder reparieren Sie ein undichtes Abflussrohr
  • bathroom-p-trap
    Sanliv Waschbecken oder Waschbecken Abfluss P-Falle
  • Sink Drain Trap Installation and Buying Guide
    Sink Drain P-Trap Kaufanleitungen und Installationstipps
  • How to Install a Bathtub Drain
    Badewanne ablassen Installation Guide und Tipps
  • How to install Pop-up Wastes and Traps
    Best Tips on How to Install Pop-up Wastes and Traps
  • Tips on Installing Pedestal Sinks
    So installieren Sie Waschbecken und Armaturen für Badezimmer
  • How to Install a Bathroom Basin/Sink Faucet
    So installieren Sie ein Waschbecken / Waschbecken Wasserhahn
  • Graphite Black Bathroom Washbasin Tap Sink Faucet
    So ersetzen Sie einen Einhand-Waschbeckenhahn
  • Bathroom Sink Drain Trap Installation DIY Tips
    Anleitung zur Installation der Spüle, des Abflussbehälters und des Pop-up-Abfalls
  • Why Does My Vessel Sink Drain Slow photo
    Langsame Waschbeckenabläufe Fehlerbehebung
  • Clearing a Clogged Floor Drain pic
    Verstopften Bodenablauf beseitigen
  • Kitchen and Bathroom Drain Plumbing Cleaning Tips
    Reinigungstipps für Küchen- und Badezimmerabläufe

Abgelegt unter: Pop-up-Abfallablauf Markiert mit: Waschbecken Abfluss P-Falle, Küchenspüle Abfluss Sanitär, Popup-Abfluss

Primäre Seitenleiste

Durchsuche die Seite

Übersetzung

EnglishDeutschEspañolPortuguêsFrançaisItalianoРусскийالعربية日本語
Als Standardsprache festlegen
 Bearbeiten Übersetzung

Sanliv Onlinestore

Twin roll toilet tissue paper holder

Armaturen

  • Automatische Armaturen
  • Badezimmerzubehör
  • Klappbare Duschfußstütze
  • Küchenarmatur
  • Vergrößerungsspiegel Make-up
Hotel Handtuchhalter Organizer WC Wandregal Nickel gebürstet
Einhand-Badewannen-Duschmischer
Einhand-Küchenarmatur zum Herunterziehen, gebürstetes Nickel
Sanliv Duschfußstütze,Eckfußstütze zum Rasieren von Beinen,Gerändelte Messing-Fußstufen-Duschleiste,Gebürstetes Nickel
Mattschwarzer Einlochgriff Waschbecken Wasserhahn
Philippe Stark Wasserhähne: Axor Starck Organic von Hansgrohe
Einhebel-Küchenarmatur zum Herunterziehen, goldfarben gebürstet
Sanliv Duschfußstütze zum Rasieren der Beine,Wandmontierte Duschstufe Fußstütze,Gerändelte Stangenfußhalterleiste aus Messing,Matt-schwarz

Urheberrechte © © 2025 Bad-Küchen-Armaturen.com mit Seitenverzeichnis